Hugs Scarf
- minartment

- Aug 1, 2019
- 7 min read

When I was in college, there were a number of times when I chose to skip doing my homework so that I could work on a personal project that really got me excited. I sewed myself a queen sized satiny duvet, knit my boyfriend (at the time, who is now my husband) a hat, and knit my friend a custom scarf.
I have a similar feeling today. I am SUPPOSED to be working on a commissioned black and white scarf (the post for which you will see when it is complete), and while I have been diligently chipping away at that project, today I felt that zing of inspiration to work on something else.
It happened earlier this Monday morning, when I was dropping my 8 year old off at summer camp. I don't want to go into too many details about my son, suffice to say, drop offs can be really difficult for him. Luckily, this camp was located within his school, and he knew the people teaching it. Still, he was reluctant and scared to join the room.
After standing out in the hall for 5 or 10 minutes, coaching my kid to breathe and telling him who all was in the room and promising he would be ok, one of the teachers came out. She said in a very matter-of-fact tone, "Hey buddy, you're one of the oldest kids in camp today. Do you want to be my special assistant? We can get you a big chair to sit in, and if you need a break you just let me know."
With that, he took her hand, and they calmly walked right into the room.
My heart swelled with appreciation. She somehow knew the exact right things to say to make him feel at ease. She gave him an "out" for all the things he was scared of. He now didn't feel the pressure to participate in a way that felt forced. He got to choose. He got to feel special.
I imagine this particular teacher thinks its common sense to talk to kids this way, it is, after all, her normal demeanor. But I don't think she realizes how unique it really is to understand kids at that level. For her, it seems intuitive. But I have had so many other experiences this summer where the adult involved had no clue how to respond to my emotional little guy.
This experience is what filled me with inspiration. I wanted to thank her for being there for and supporting my son in exactly the way he needed.
So I started to think about what my feelings might look like. I thought about what colors she might like, based on the clothes I've seen her wear. Based on her general energy and personality. I wanted to get this done in one day, so I limited myself to the yarns on-hand. Darker tones. Muted. Warm. I want to capture the snugglyness and comfort of a hug.
I settled on a tri-tone self striping yarn in mustard, plumb, and almost periwinkle-grey. I picked a contrasting solid colored yarn of similar tone for the patterning.
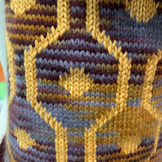
Because I was working quickly, I just trusted my gut, and drew the image that came to mind when I think of a hug. A warm, snuggly, appreciative, comforting hug. It's a gently curving wave length to start, then another line mirrored to that to create a pattern. Something is in the middle of these waves. A dot, represents a person, or a feeling, or a moment in time. Together, the waves wrapping around the dot looks almost like arms wrapping around a child. When you look down, all you see is the top of their head.
I didn't test the pattern. I didn't even draw it out on the punchcard before I started to punch (so risky!). I just used graph paper to plot it out, make sure it would repeat within the 24 stitch, 60 row limit of my punch card, and that the pattern was symmetrical.

My yarns were pretty thick, so I stuck the punch card in the bulky machine and fired her up! It didn't take too long for me to realize that the bulky machine doesn't really work with punchcards intended for a standard gauge. Bulky punch cards are only 12 stitches wide, so it was only selecting every other needle. Turned out to be ok, though, because the stitches were too loose even in the tightest tension. Fingers crossed the yarn won't get jammed up in the standard gauge machine.
Got going on the standard gauge, and after about 100 rows there was a knot in the yarn which got caught in the tension mast and the yarn broke, causing most of the stitches to fall off. I decided it wasn't worth the time to rehang it compared with how long it would take to frog it and start again. Plus, this gave me an opportunity to check that the pattern was working before I used up more precious time.

It looked pretty good, though I noticed the "hug waves" were much rounder than I had intended. And with the dot in the middle, the pattern looks like a lot of boobs. I kinda don't mind that, though, because it still gives off the vibe of being warm and soft and welcoming, just like boobs to a baby, and I can't think of a better way to represent maternal comfort than breasts so I'll call this a happy mistake. And if you don't have a perverted mind like me, the pattern just looks like some dots and squiggles! It has a pleasant geometric quality to it.
Of course, because I was working with available yarns, I ran out of the golden pattern color I was using, and had to improvise with another color I had. I felt really lucky when I was able to complete the same number of rows with both the gold contrast and the purple contrast I used. Also, I have 3 balls of this background color yarn, but each one has a slightly different texture to it. I don't know if that's from being from different lots or if its the same color of 3 different yarn contents. No big deal, I don't think anyone would ever be able to tell. Especially since I'm changing the background yarn at the same time as the pattern color yarn.
As much as I wanted to finish this in one go, I ran into inevitable hang ups. Like that time when the yarn guide FELL OFF. I didn't even know it could do that. Nor what made it do that. And the handful of times the color changes didn't work quite right and created really long unnecessary floats that I had to either frog to fix or work the excess yarn along the already knit stitches. That really slowed things down!
After a couple days in the studio, I finished the knitting. I noticed the floats along the back of the scarf were too long to leave alone. And that the scarf was really rolling up, despite my efforts to steam it flat. I needed to come up with a way that would prevent rolling and cover up the floats.
Option 1. Sew a fabric onto the back.
The only fabric I have on-hand is some fleece, from a charity project I wanted to do a couple years ago (making knot blankets for the paradise fire victims... didn't get my act together in time and the blankets I managed to make I ended up donating to our local ER vet where my cat died last year... the best laid plans...) But the quality of this fabric really lowered the overall appeal of the scarf and its intricate pattern. and would make it altogether too bulky. Someone on instagram suggested I use a light weight fabric or chiffon, so that the floats would be covered but you could still see them because they create their own attractive pattern, but I didn't have time to acquire such fabric nor could I figure out how to attach it nicely to the scarf. I'd have to sew it on by machine and then probably tack it down in a few strategic places through the length of the scarf? I dunno. Someone else suggested I knit a light weight panel out of fine yarn. That's a pretty good idea, but again, limited to materials on-hand, and none of my finer yarns looked good with these colors. bummer.
Option 2. Fold the scarf in half and sew it closed.
I liked this option because it seemed quick, easy, and doable. Of course, when I was testing it out on my Hague Linker, the yarn I was using for the stitches was too thick and jammed up the machine. Also, even though the linker is supposed to be a huge timer saver, it still isn't for me. I need more practice with it. It may have taken me hours to sew that one seam. And then I'd have an unfinished seam on the OUTSIDE of the scarf, because I didn't want to have the bulk of the seam if I sewed it with right sides together then turned it inside out to hide the seam edge. knowhatimean? And folding it in half would really compromise the visual impact of the pattern. Not ideal. What else?
Option 3. Hand knit the floats.
My original instinct was to just hand knit the floats in a few places where they were the longest. I thought this might help the scarf to lay flat by creating some counter tension on the back of the scarf I tested this out, and discovered that it made the face of the fabric pucker a lot, which was not my intent. Also, it's a technique that would, in theory, take a lot longer than folding it in half and linking the edges.
But after thinking through these other options, I realized that, as usual, the most time consuming, finicky solution is the right thing to do. So I set out to hand knit all the floats.
I was pleasantly surprised by the texture this created! Now, instead of a bunch of round boob-like shapes, there is a 3d quality to the face of the fabric. Combined with the patterning, this makes it look almost like chains. This is another happy accident. It makes me think how appropriate this symbolism is to my inspiration. The cliche "only as strong as your weakest link" comes to mind, but in this application, I'm feeling like each link in the chain is one of her students, picturing my kid being the weakest link and the way in which she made him stronger... The suggestion is that there are no weak links here, because her strength of character is what supports each one and makes them strong.
And, the raised texture of these shapes looks even more snuggly and hug-like.
Visually, I'm pleased with how the Hugs Scarf turned out. However, it rolls like crazy, it's a bit shorter than I'd want for a scarf, and it's pretty thick and stiff. Not sure it'll be comfortable as a scarf, but maybe it can be used as just a tactile, sensory object. Another tool to use with kids who need a different kind of support, maybe? Either way, I hope the teacher likes it and feels appreciated. I for sure enjoyed making it and having the opportunity to be inspired and express myself through art and writing.
-nina


Comments